躯体塑形手术术前标记与切口设计:标准化操作要点
2026年10月2日23 min read
Plastic and Reconstructive Surgery Global Open
结论与实践要点
研究类型: 本文为 技术述评(叙述性技术文章) ,由单一中心的术者总结其躯体塑形手术的标准化标记与切口经验,并非随机对照试验、队列研究或系统综述,文中亦未报告样本量、并发症率或患者报告结局。
临床解读: 文章的价值在于把常用于减重后形体畸形的四类手术(fleur-de-lis 腹壁成形、下躯体提升、大腿内侧提升、臂部成形)的标记流程化、可教学化。其核心思路——站立位骨性标志定位、捏夹试验估算切除量、麻醉后复核、预留安全边界——可作为年轻医师学习与团队统一的参考框架。
证据边界: 所述“手术时间缩短”为作者所在中心的回顾性经验,缺乏对照组与统计学比较;作者已声明无并发症或满意度数据。因此文中技术要点宜视为 术者经验与操作建议 ,临床应用仍需结合患者个体解剖、畸形类型与团队熟练度,并配合规范的围手术期安全管理。
Background:The number of patients with obesity is rising, along with the desire for bariatric and postbariatric surgery. Applying a single surgical technique to all patients is challenging due to the body deformities that result from massive weight loss and the variety in body shape.
Methods:Due to the large number of postbariatric patients who wish to have body contouring surgery, the Catharina Hospital in Eindhoven has been perfecting its techniques for years.
Results:This article describes standardized preoperative markings and techniques of the fleur-de-lis abdominoplasty, lower body lift, inner thigh lift, and brachioplasty.
Conclusions:This article offers an overview of standardized techniques for body contouring surgery. These techniques save time and help to teach residents and colleagues.
Question: Is there a uniform technique in body contouring surgery that can be applied to all body types?
Findings: One technique can be applied to all body types in body contouring surgery.
Meaning: This article provides a standardized technique for body contouring surgery measurements that can be applied to all body types after massive weight loss and is easy to teach to residents and colleagues.
With the rise of obesity, more people are opting for bariatric surgery. 1 – 5 After such an operation, most people lose significant weight, often resulting in excess skin. 6 This excess skin results in insecurities about appearance but can also cause problems in social, physical, and psychological functioning. 6 , 7 Body contouring surgery improves these aspects and, therefore, improves health-related quality of life. 8 – 10 Body contouring surgery includes procedures that improve body shape by removing excess fat and skin. Examples are abdominoplasty (AP), mastopexy, lower body lift (LBL)/upper body lift, and brachioplasty/leg dermolipectomy. 11 , 12 Due to the increasing number of people opting for bariatric surgery, the number of patients with excess skin opting for body contouring surgery is also rising. 13 – 15
Many techniques have been described over the years. However, body deformities and variations in shape after weight loss make it difficult to apply a single method to all patients.
The Catharina Hospital in Eindhoven, the Netherlands, is a bariatric center that performs around 700 bariatric procedures a year. Therefore, many patients visit the plastic surgery department due to excess skin issues. The Catharina Hospital has been studying the effect of body contouring surgery on health-related quality of life for more than 10 years. It performs almost 100 body contouring procedures per year, including LBLs, vertical lower body lifts, upper body lifts, APs, fleur-de-lis abdominoplasties (FDLs), brachioplasties, and inner thigh lifts. This teaching hospital has been working on a standardized technique for 15 years that can be applied to all body types after massive weight loss. This standardized method facilitates effective teaching of this technique to residents and colleagues. This article describes the preoperative markings and techniques of the FDL, LBL, inner thigh lift, and brachioplasty.
Patients with skin laxity in the horizontal plane do not fully profit from a standard AP, as it primarily corrects skin surplus in the vertical plane. The FDL adds a vertical component, correcting skin laxity in the horizontal plane. Most patients who undergo this surgery have previously had bariatric surgery and lost a significant amount of weight, causing excess skin and deformities. 12 , 14
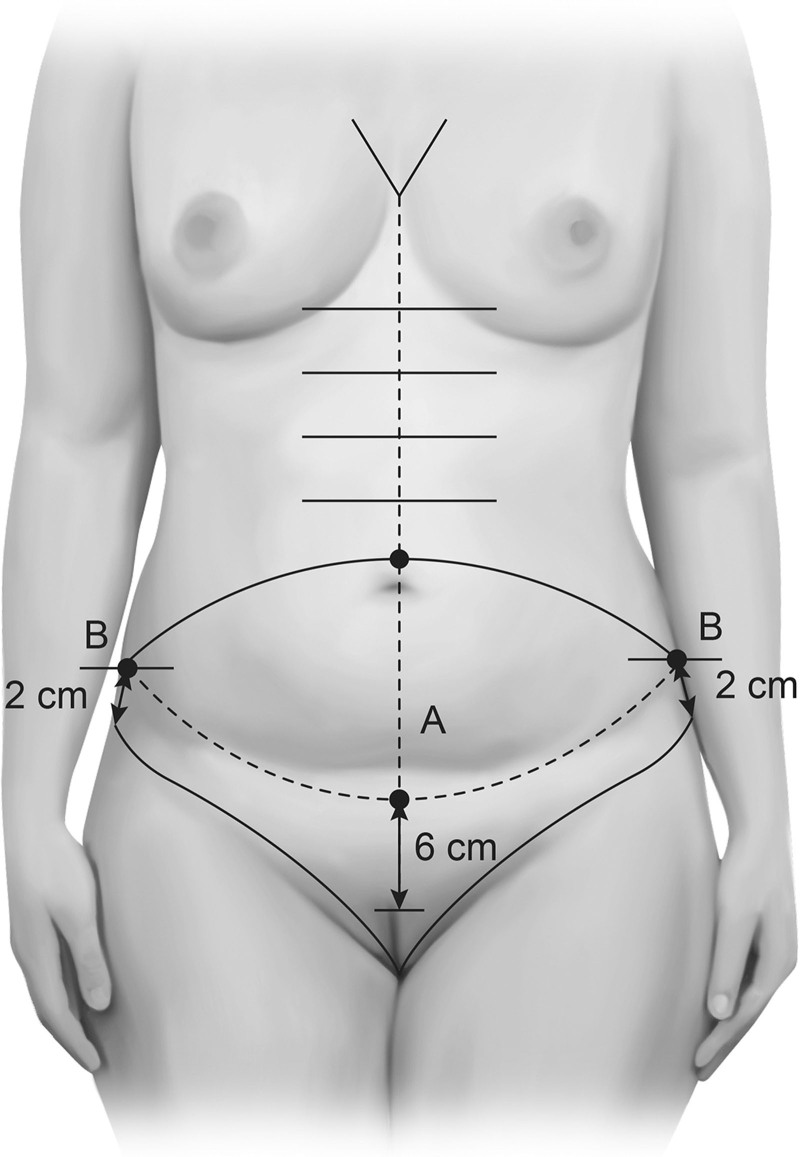
Preoperative markings are made when the patient is standing upright. A vertical line is drawn from the xiphoid to the vulvar commissure. Along this line, hatch marks are drawn 5 cm apart until the level of the umbilicus, ensuring symmetrical skin closure (Fig. 1 ). The midaxillary lines are defined, and a point 8 cm under the anterior superior iliac spine (ASIS) is marked (Fig. 3 ).
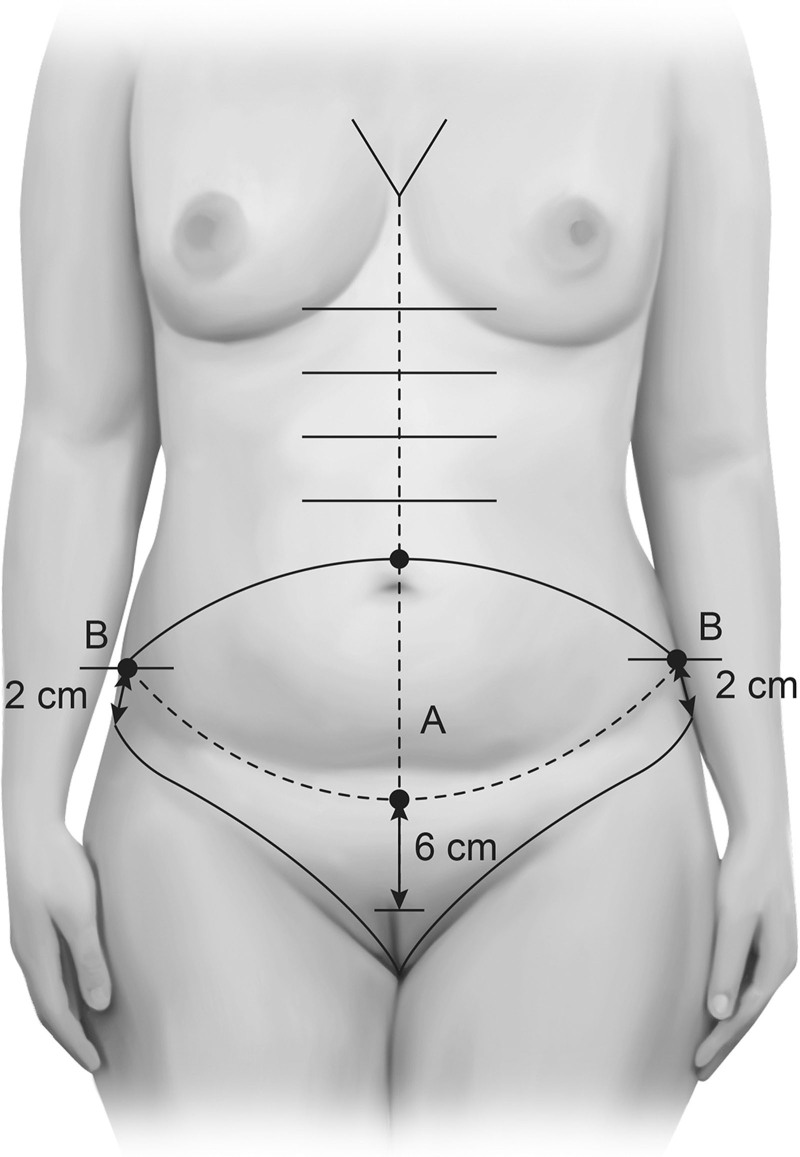
Fig. 1. Markings of the FDL.The rest of the markings are placed when the patient is supine and under anesthesia, with the operating table in the Trendelenburg position. With mild upward tension on the pubic area, a point 6 cm above the vulvar commissure is marked in the midline (Fig. 1 , A). From this point, a horizontal line is drawn to the inguinal crease. The lateral end of the pubic area is chosen 2 cm above the inguinal crease to shape the triangular aspect of the pubic area. ( See Video 1 [online] , which displays the preoperative markings of the LBL with FDL.) The lateral ends of the pubic area are connected to the midaxillary line, resulting in a standardized lower incision in all patients.
Next, a line is drawn from the umbilicus toward (Fig. 1 , B) the midaxillary line, marking the amount of undermining. The procedure starts by dissecting the umbilicus from the abdomen until the surgeon reaches the first rectus fascia. After this, the inferior incision is made up to the Scarpa fascia. The flap is undermined cranially up to the line from the umbilicus toward the midaxillary line (Fig. 1 ). The midline is incised toward the xiphoid process. In significant abdominal rectus diastasis, plication is performed using 2 continuous 1-0 polydioxanone sutures or Maxon loops. After plication, the patient is placed in a beach chair position to determine the resection. A sharp towel clamp is used to hold the skin on multiple points on the inferior side of the incision, folding the cranial skin flaps over the clamp and marking the location of the clamp. By connecting these points, the superior border of the incision is marked, and the vertical surplus is excised. The horizontal surplus is determined by placing a suture through the skin at the xiphoid process and holding it over the midline. The skin is held in place under maximal tension at the level of the umbilicus by holding it with 2 sharp towel clamps while avoiding excessive tension at the inverted T point. The incision is marked 2 cm medial from the projected midline as a safety measure, and the surplus is excised (Fig. 2 ). A prominent mons pubis can be debulked by diathermic dissection or liposuction, after which it can be fixated on the rectus fascia with 3 absorbable sutures, creating a smooth transition between the superior and inferior resection border.
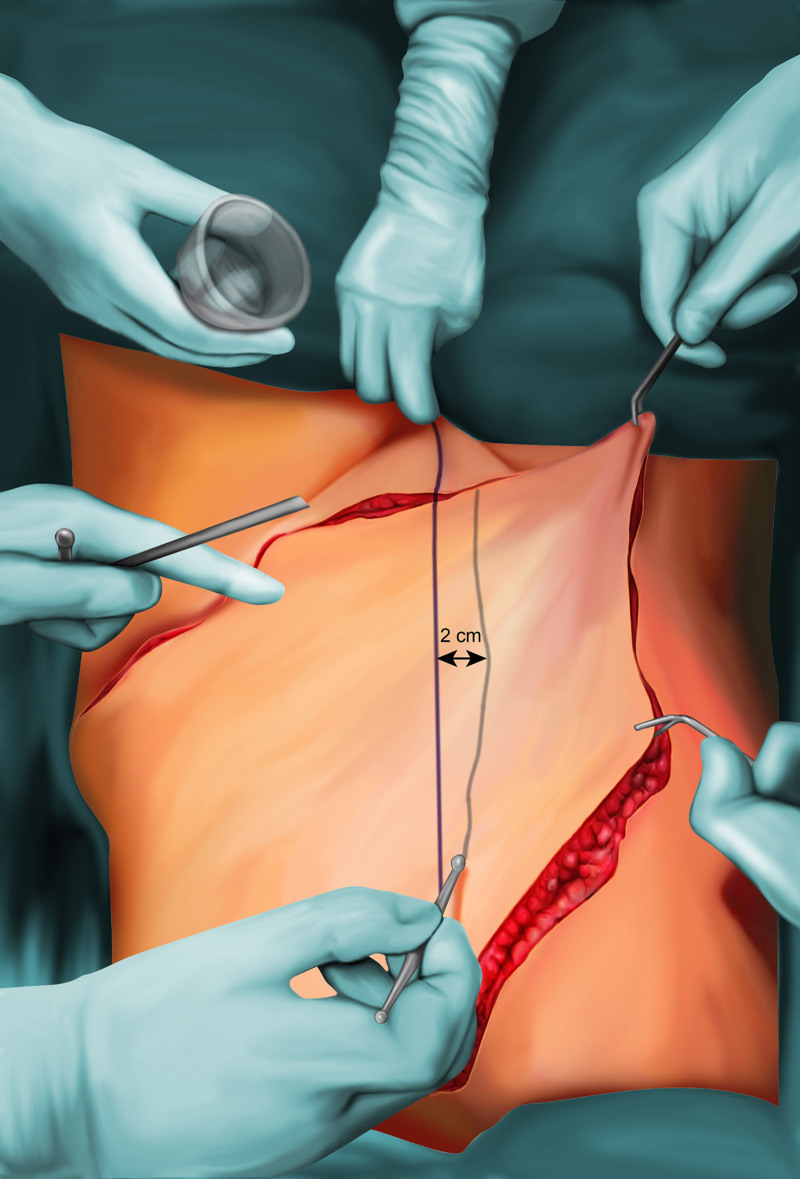
Fig. 2. Vertical markings of the FDL.High vertical tension sutures are placed along the midline. Starting from the xiphoid, the abdominal rectus is fixed to the subcutaneous tissue, and single absorbable sutures are placed while holding downward traction on the skin with towel clamps, ending at the horizontal incision. Additionally, quilting sutures are placed to obliterate dead space at the remaining parts of the abdominal flaps to reduce the risk of seroma. Finally, temporary staples are placed for prevention of dog ears, and the wound is closed with continuous Vicryl 1-0 sutures in the Scarpa fascia after stepwise removal of staples, followed by sub/intracutaneous continuous Vicryl 2-0 sutures, placing the needle in a 45-degree angle from intracutaneous to subcutaneous and from subcutaneous straight to the contralateral side of the wound from subcutaneous to intracutaneous. This technique by Le Louarn and Pascal 16 uses just 1 continuous suture for sub- and intracutaneous sutures, possibly causing less inflammation in the wound compared with 1 layer of single subcutaneous sutures and 1 layer of intracutaneous continuous sutures.
Finally, the umbilicus is reattached to the abdomen. A small oval of skin is removed, and if necessary, the umbilicus is shortened by fixing it to the fascia cranially and caudally with 3-0 Vicryl. The skin of the umbilicus is closed with interrupted subcutaneous 3-0 Vicryl sutures, followed by intracutaneous running sutures with 4-0 Vicryl Rapide.
补充视频 / 附件(原文未随文提供原图,可于出版方页面查看)gox-13-e6651-s001.mp4Video 1 displays the preoperative markings of the LBL with FDL.
The LBL removes excess skin from the back and abdomen. The abdominal part uses vertical and horizontal incisions (fleur-de-lis). The posterior part of the surgery can also include augmentation of the buttocks by using de-epithelialized central dermal pedicles. 17 , 18 By perfecting the LBL technique, we reduced the operating room (OR) time from 6 to 3–4 hours.
The patient is standing in an upright position. The midline of the back is drawn, ensuring symmetrical wound closing. The lateral border of the gluteal fold is marked, followed by the midaxillary line. The ASIS is marked, as well as a point B, 8 cm below the ASIS (Fig. 3 ). This point B is the estimated superior border of the resection. A conservative pinch test is applied to estimate the resection. The inferior border of the pinch is shown in Figures 3 and 4 as C and will be the scar’s location so that it can be hidden underneath the underwear. Areas that need liposuction, such as the flanks and central area over the sacral region, are also marked.
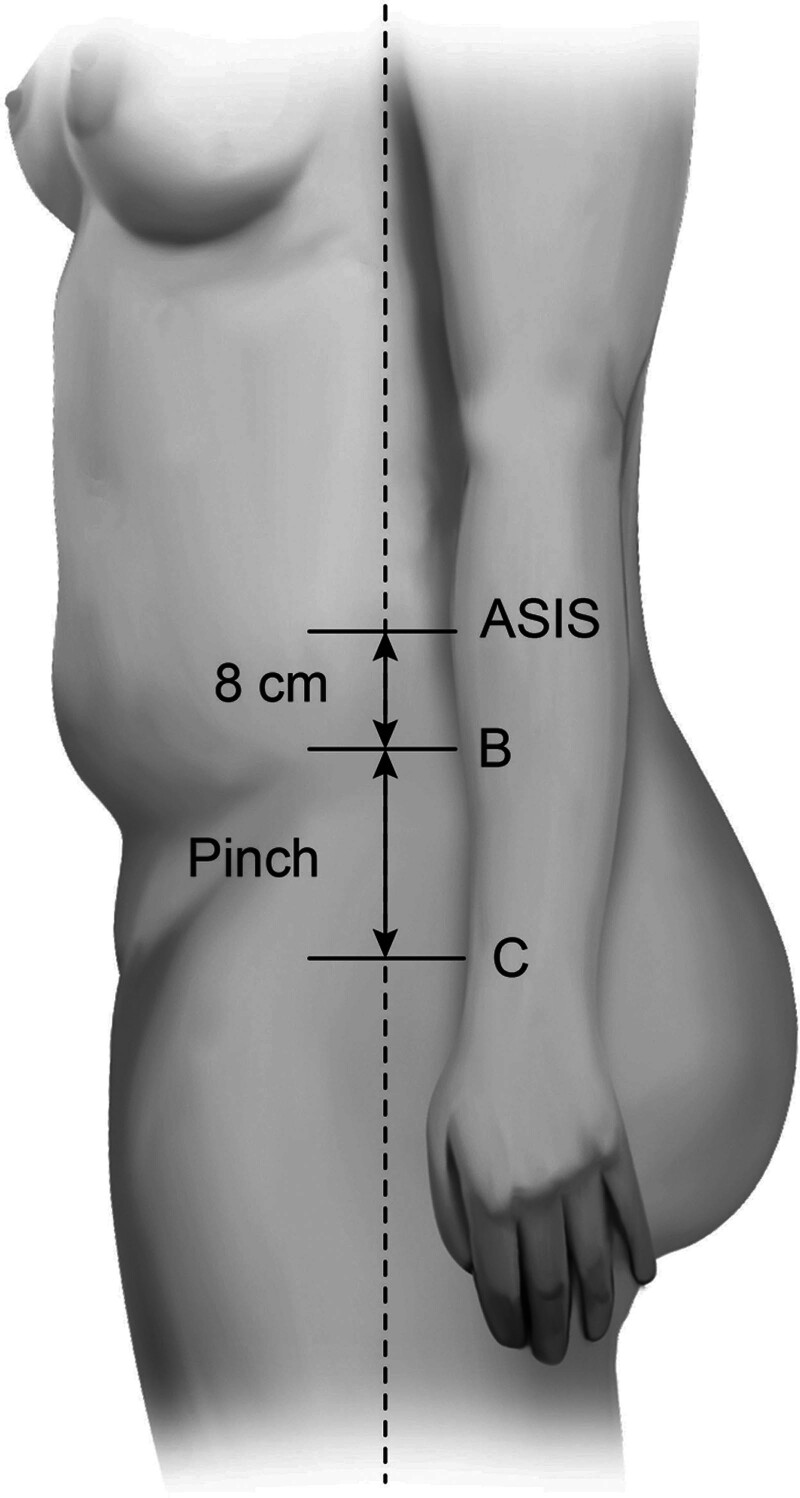
Fig. 3. Lateral markings of the LBL.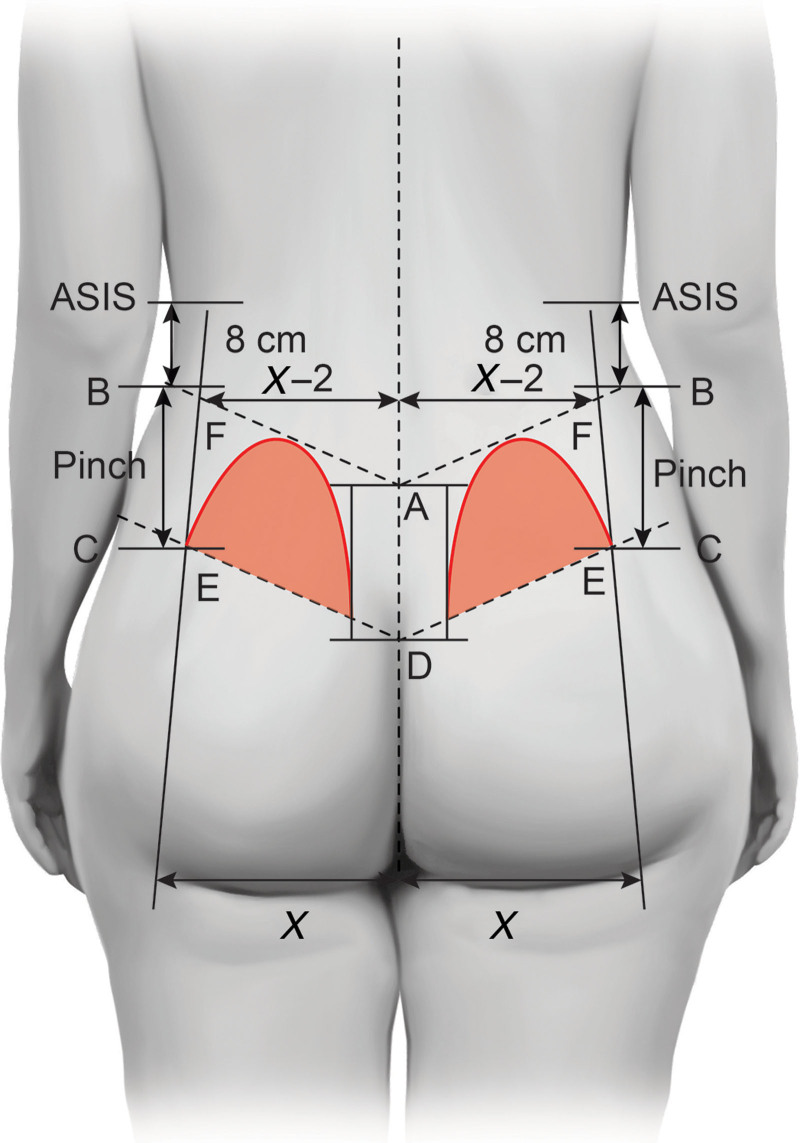
Fig. 4. Dorsal markings of the LBL.The rest of the markings are outlined while the patient is asleep. The surgery starts with the patient in a prone and Trendelenburg position. The superior border of the natal cleft is again marked in this position, as it will indicate the inferior point of the resection in the midline (D, Fig. 4 ). The space between this new superior natal cleft (D, Fig. 4 ) and gluteal fold should be 14–16 cm. Pascal 19 describes the tightening rule of 16, stating that no force is transmitted further than 16 cm from the scar. We take a 2 cm safety margin.
Next, the preoperative marks are verified. A sharp towel clamp is used to determine the superior border in the midline by holding the skin between points A and D (Fig. 4 ). It is moved superiorly and inferiorly to its maximum stretch while placing a ruler at the clamp when it is at its most superior point, then moving the clamp to its most inferior point. The ruler’s position now indicates the most superior resection border in the midline. As a safety measure, 6 cm inferior to this point is the final position of the superior resection at the midline (A, Fig. 4 ). The inferior border remains as described earlier (D, Fig. 4 ). It is important to be conservative in this area as the skin is attached to the bone and, consequently, has poor mobility. 19 Over-resection can cause skin dehiscence and necrosis.
The distance from the lateral edge of the gluteal fold to the natal cleft is measured ( X, Fig. 4 ). A point (F, Fig. 4 ) is identified on the superior resection border at the midline (A, Fig. 4 ), located at X − 2 cm, perpendicular to the midline. This ensures no excess lateral fat on the hip, contributing to an hourglass shape. A vertical hatch mark is placed between point F and the lateral border of the gluteal fold (Fig. 4 ). The central part of the inferior resection border (points D to E) is marked by holding a ligature along the line connecting points C and D. At the hatch mark (the vertical line between F and E), the previously described towel clamp method establishes the superior border. A 4 cm safety margin is maintained at this hatch mark. Next, the remaining superior resection border is marked by connecting points A, F, and B. Subsequently, the same technique is used to determine the inferior resection border in the midaxillary line. Therefore, the skin at point B is moved to its most inferior point, placing a ruler at the clamp when it is at its most inferior point, holding the ruler in the air, and moving the clamp to its most superior point. Again, to prevent tension, mark 4 cm superior to this point to obtain the inferior resection point in the midaxillary line, marked as C in Figure 4 . Points E and C are connected, creating the total inferior border of the resection ( see Video 1 [online] ).
In the midline, 2 cm lateral to each side is marked and incised until the deep fascia to create a natural curve. In case of buttock atrophy and a patient’s desire for auto-augmentation, flaps are marked for augmentation of the buttocks (Fig. 4 ). These flaps start at the inferior incision border and extend from the lateral hatch mark to the border of the curve in the midline. Once marked, the areas that need liposuction are injected with a saline/adrenalin solution to obtain a wet state.
The inferior, superior, and lateral borders are incised, then the flaps are incised and de-epithelialized. The inferior incision is undermined downward, and the flaps are anchored in this pocket with 1-0 Vicryl sutures to create volume. Next, excess tissue is resected above the Scarpa fascia, and the wound is approximated with staples and then closed with continuous Vicryl 1-0 sutures in the Scarpa fascia, followed by sub/intracutaneous continuous Vicryl 2-0 sutures as described by Le Louarn and Pascal. 16 The lateral incisions are temporarily closed with staples, after which the patient is turned supine for the anterior side of the LBL. Preoperative and postoperative pictures are shown in Figures 5 and 6 .
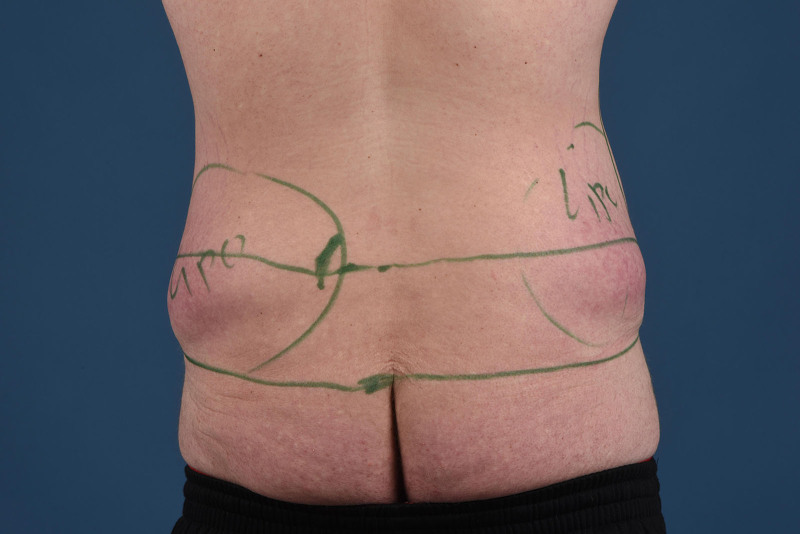
Fig. 5. Dorsal side of the LBL, preoperative.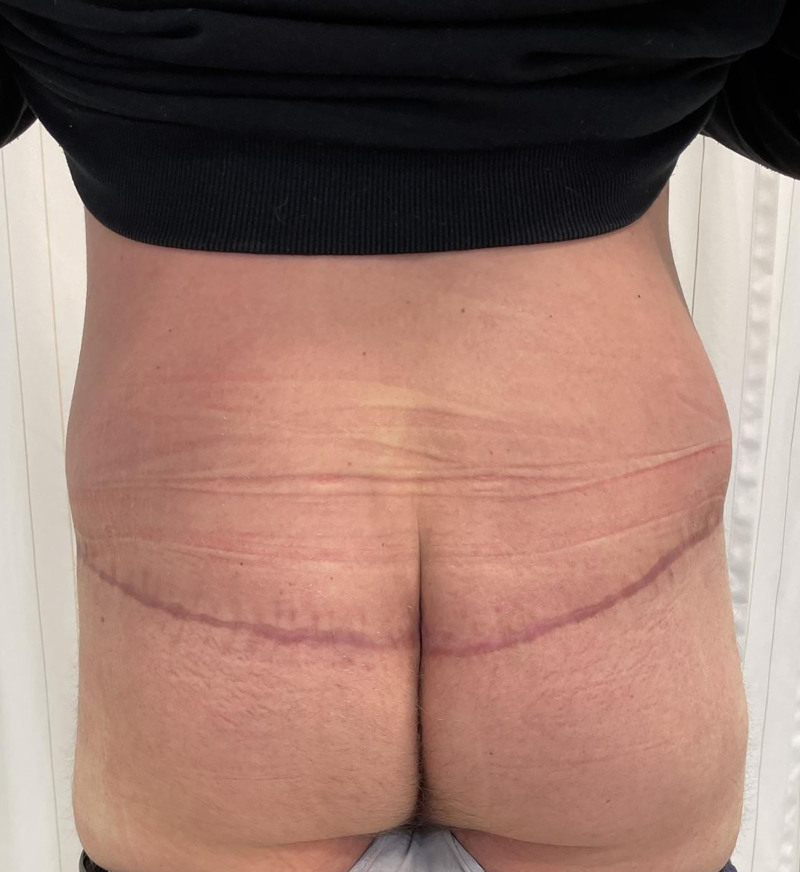
Fig. 6. Dorsal side of the LBL, postoperative.
Before surgery, markings are made following the same design as the FDL described earlier. However, the inferior resection border of the abdomen is determined by the inferior border of the resection on the back. It runs between C and E (6 cm above the superior border of the vulvar commissure, Fig. 7 ). The rest of the ventral side of the operation is the same as described earlier with the FDL. Finally, the dorsal and ventral parts meet at the lateral incision to form the LBL. Preoperative and postoperative pictures are shown in Figures 8 and 9 .
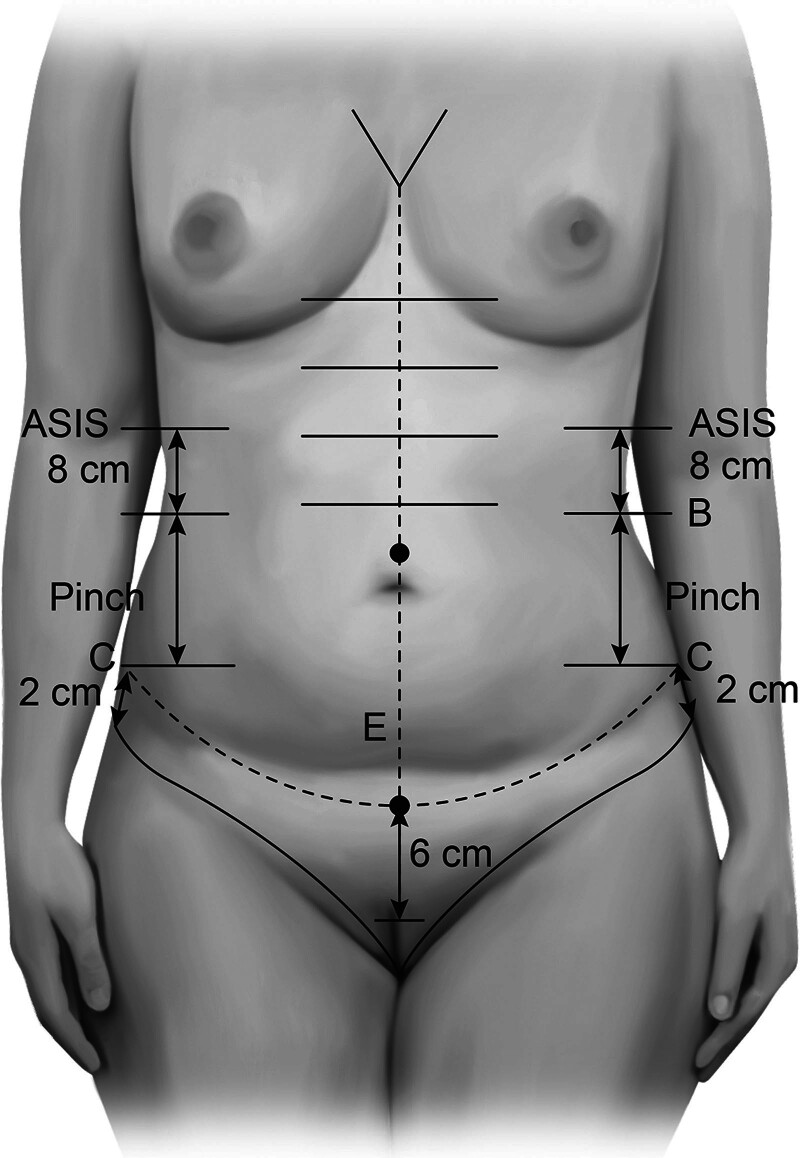
Fig. 7. Anterior markings of the LBL.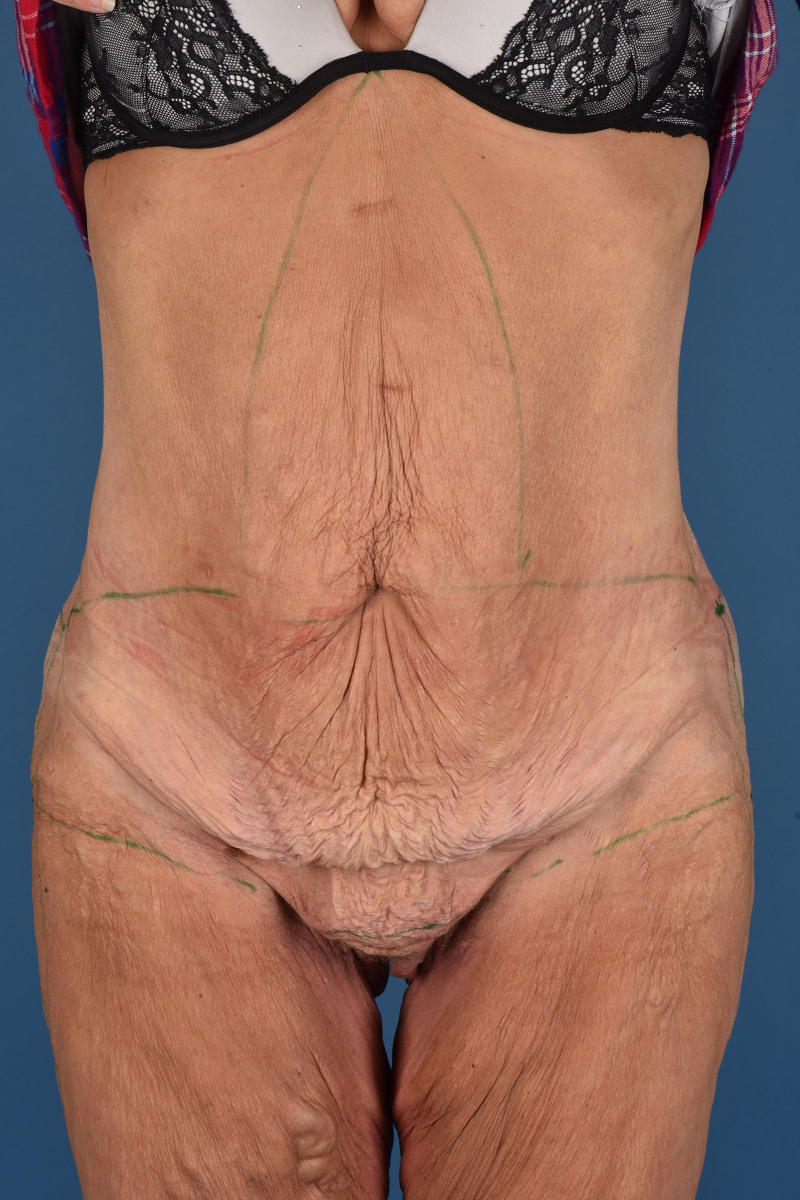
Fig. 8. Ventral side of the LBL/FDL, preoperative.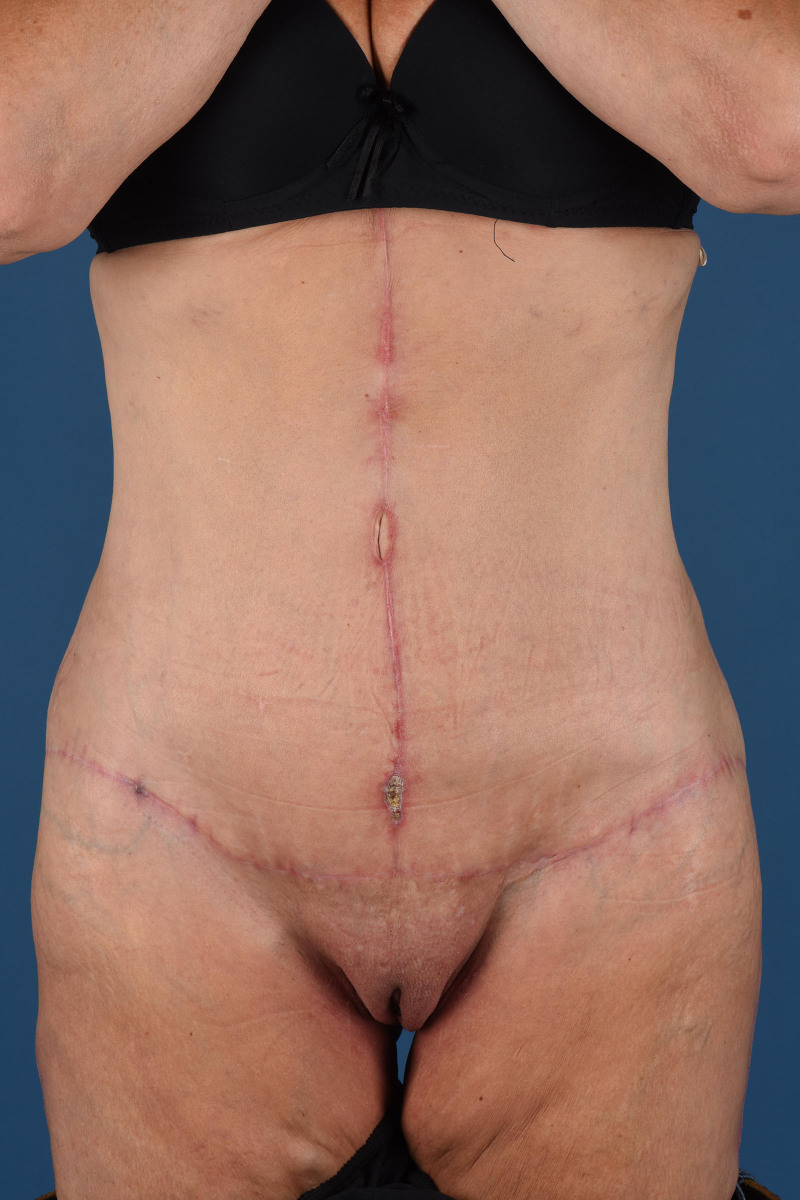
Fig. 9. Ventral side of the LBL/FDL, postoperative.
The inner thigh lift is a surgery performed on patients with excess fat and skin on the inner thighs. The excess fat is removed by liposuction, and excess skin is excised. Liposuction is performed on the anterior and medial side of the legs, whereas the skin is excised on the inner thighs only.
With the patient standing upright, the anterior fat pad is marked on both legs to mark the area of liposuction. A line is drawn from the medial midpoint of the upper leg to the knee. A pinch test checks if the anterior skin moves to the medial midline of the leg without tension. This anterior point is marked (Figs. 10 , 11 , A). Next, the inguinal crease is marked as well as a line from the inguinal crease to point A. This line is extended to the knee, creating the anterior resection border and a triangular shape with the medial midline. A hatch is marked every 10 cm. The distance from the anterior resection border to the medial midline is measured to extend the drawing to the leg’s dorsal side. Finally, dorsolateral fat pads are marked for liposuction. ( See Video 2 [online] , which displays the preoperative markings of the inner thigh lift.)
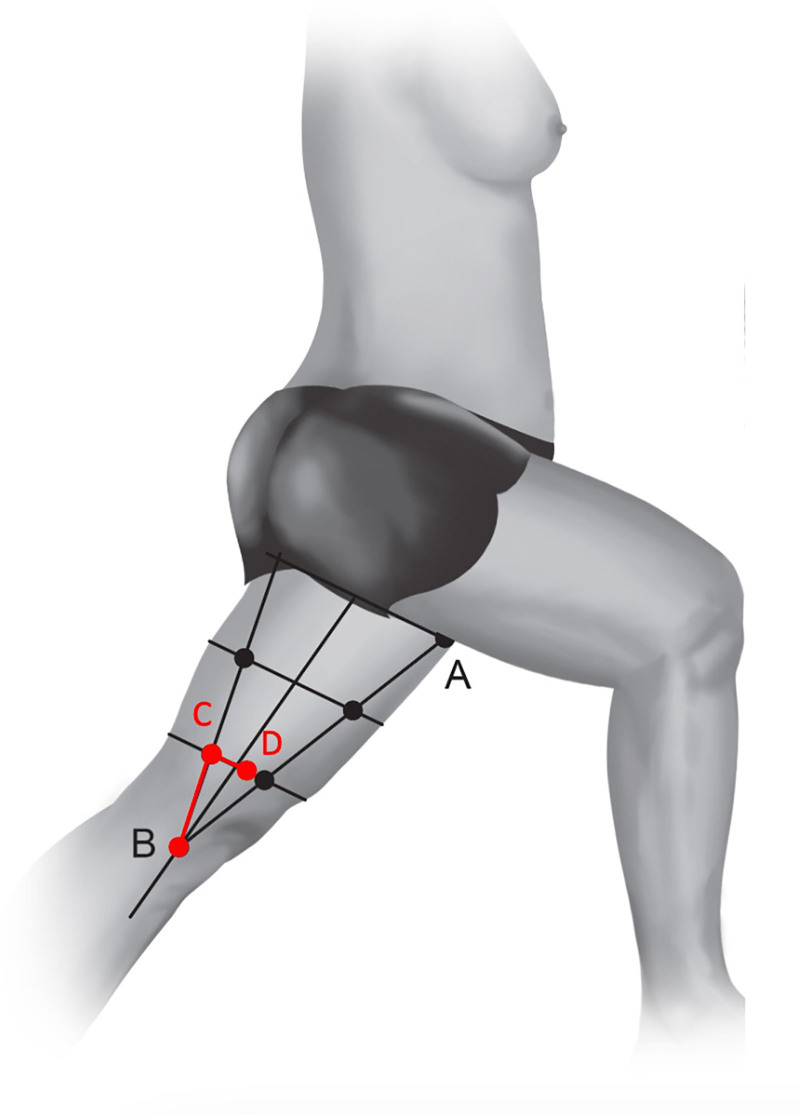
Fig. 10. Medial markings of the thigh lift.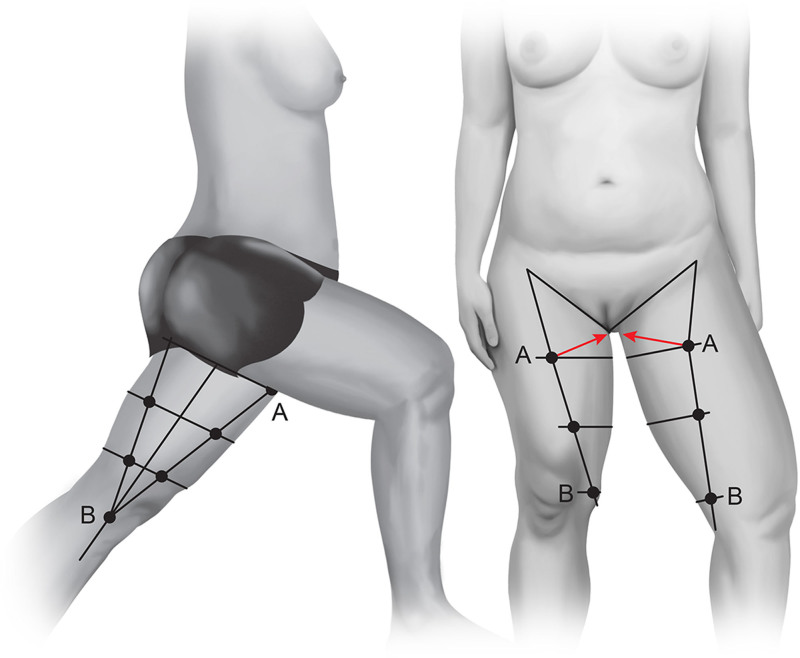
Fig. 11. Anterior and medial markings of the thigh lift.In the OR, the patient lies supine with the legs separated. First, if desired, liposuction is performed on the ventral and medial thighs and the lateral side.
The first incision is initiated at the posterior line. It starts at the most inferior point (B), extends toward the first hatch mark, and then progresses just over the midline. While stabilizing the leg, the surgeon uses a sharp towel clamp to hold the skin between points C and D (Fig. 10 ) and stretches it anteriorly, placing a ruler at the clamp when it is at its most anterior point, holding the ruler in the air close to the skin at this same point and moving the clamp posteriorly. The location of the ruler is marked in the hatch mark and now shows the most anterior point of the resection. As a safety measure, 4 cm posterior to this border will be the final point of the anterior resection. ( See Video 3 [online] , which displays the technique used for the skin resection of the inner thigh lift.) Next, the rest of the skin of the first triangle is incised and removed, and staples are placed, as swelling can complicate wound closure.
The same technique is used for the following hatch marks, finishing with the incision in the inguinal crease and closing with 2-0 Vicryl sub/intracutaneous sutures. 16 The incision should not be extended beyond the inguinal crease to prevent damage to the lymph nodes. Preoperative and postoperative pictures are shown in Figures 12 – 15 .
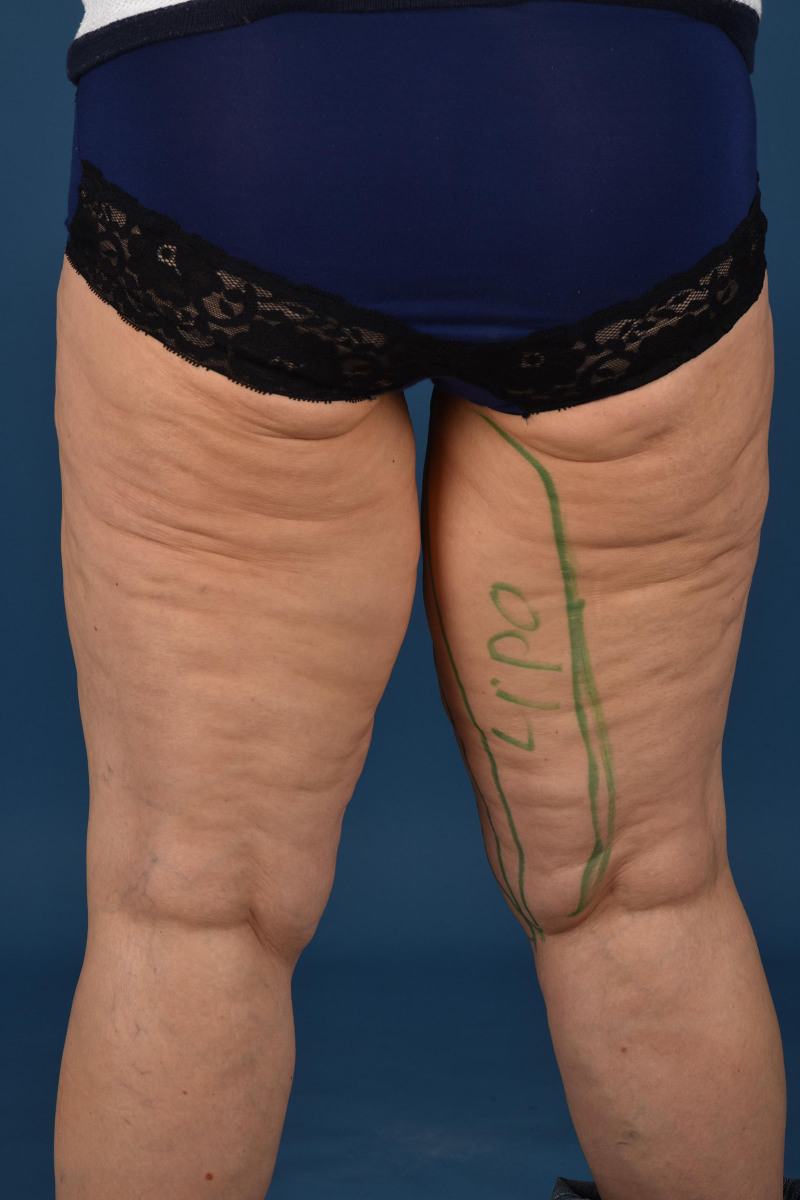
Fig. 12. Dorsal side of the inner thigh lift, preoperative.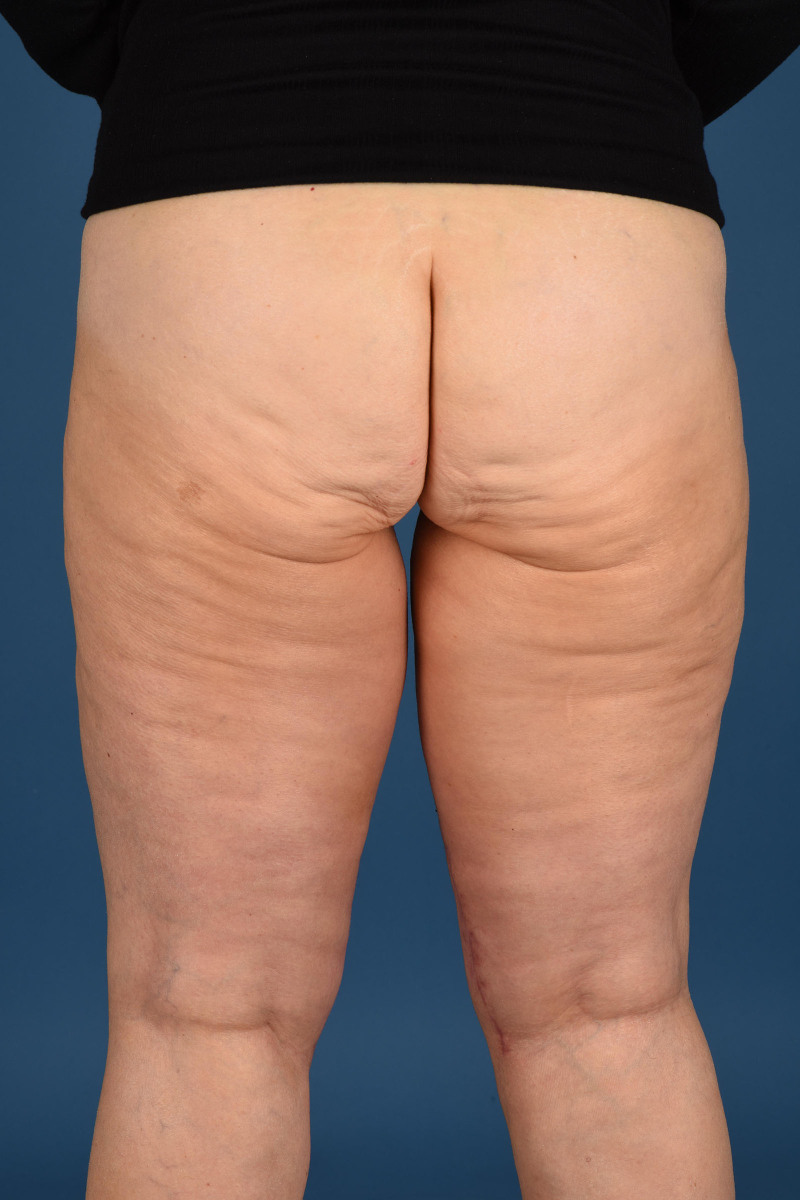
Fig. 13. Dorsal side of the inner thigh lift, postoperative.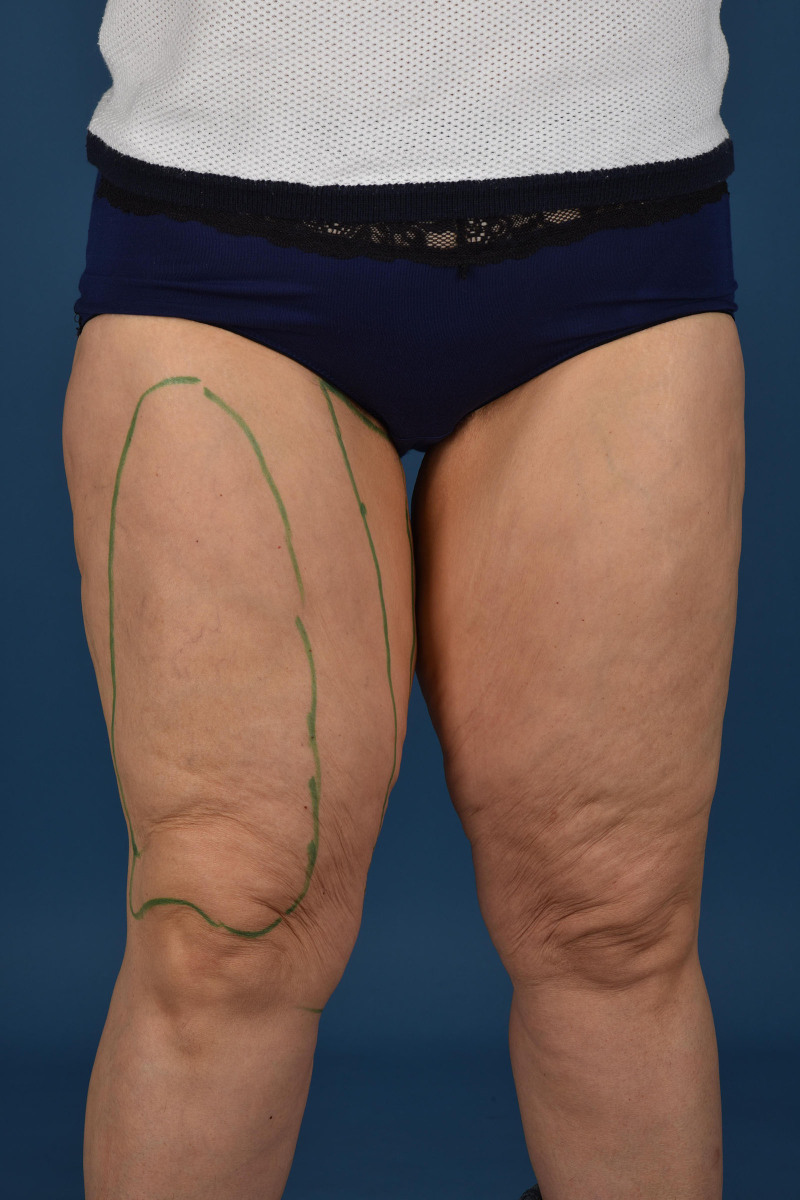
Fig. 14. Ventral side of the inner thigh lift, preoperative.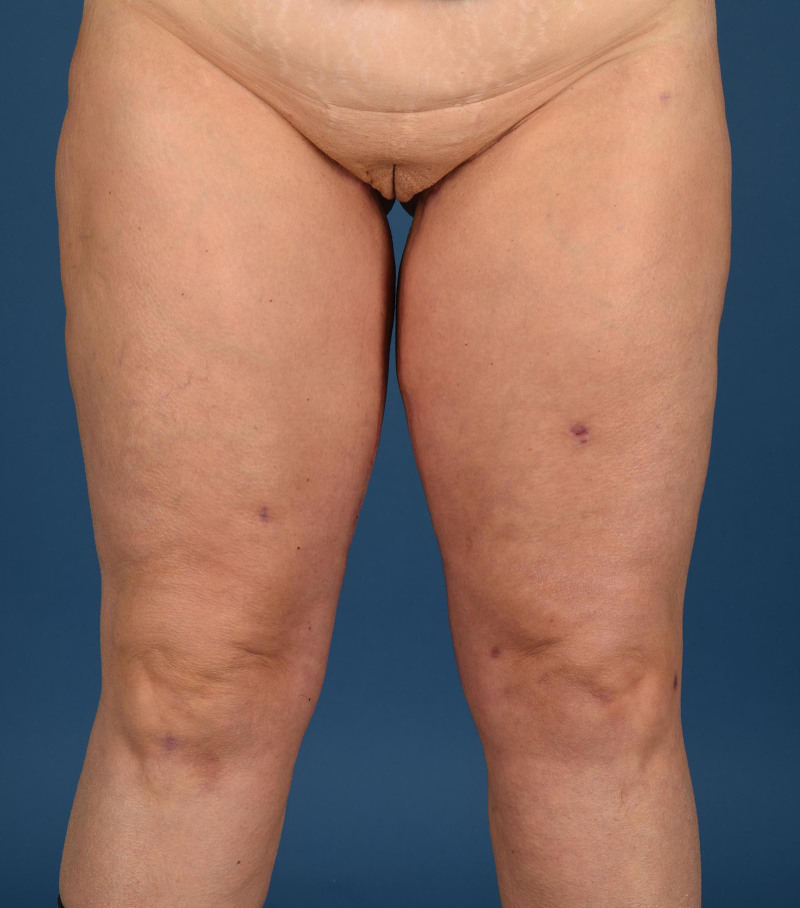
Fig. 15. Ventral side of the inner thigh lift, postoperative.补充视频 / 附件(原文未随文提供原图,可于出版方页面查看)gox-13-e6651-s002.mp4Video 2 displays the preoperative markings of the inner thigh lift.补充视频 / 附件(原文未随文提供原图,可于出版方页面查看)gox-13-e6651-s003.mp4Video 3 displays the technique used for the skin resection of the inner thigh lift.
The midaxillary line is drawn along the upper arm. Hatch marks are placed every 5 cm. The skin surplus is assessed by palpating where skin meets muscle as the patient holds their arms at a 90-degree angle to the trunk (Fig. 16 ). The transition’s border is marked and represents the liposuction area. A line is drawn 2 cm toward the midline to signify the expected incision lines. ( See Video 4 [online] , which displays preoperative markings of the brachioplasty.)
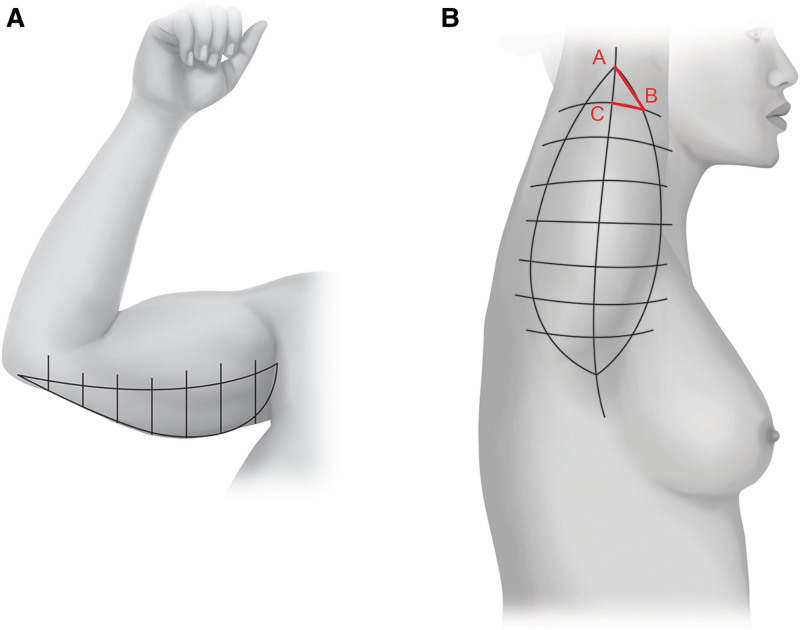
Fig. 16. Markings of the brachioplasty. A, Medial view of the brachioplasty. B, Dorsal view of the brachioplasty.In the OR, the patient lies supine with arms elevated toward the head or extended at a 90-degree angle at the shoulders. The liposuction area is injected with saline/adrenalin until a wet state is achieved. After the adrenaline takes effect, liposuction is performed in the marked area until both deep and superficial compartments are emptied.
Subsequently, the first incision is made at the distal part of the upper arm (point A in Fig. 16 B). The anterior mark and two-thirds of the hatch mark are incised, after which the sharp towel clamp is used to hold the skin between points B and C (Fig. 16 B) and stretched posteriorly, placing a ruler at the clamp when it is at its most posterior point, holding the ruler in the air at this same point and moving the clamp anterior. The location of the ruler is marked in the hatch mark and now shows the most posterior point of the resection. The final point of posterior resection will be 4 cm anterior to this border.
Next, the remaining skin of the first triangle is incised and removed, and staples are placed to prevent the wound from not closing due to swelling. The same technique is used at the following hatch marks, finishing at the axilla. The skin is closed with 2-0 Vicryl sutures by Le Louarn and Pascal. 16 Preoperative and postoperative pictures are shown in Supplemental Digital Content 1–4. ( See figure, Supplemental Digital Content 1 , which displays the dorsal side of the brachioplasty preoperatively, http://links.lww.com/PRSGO/D943.) ( See figure, Supplemental Digital Content 2 , which displays the dorsal side of the brachioplasty postoperatively, http://links.lww.com/PRSGO/D944.) ( See figure, Supplemental Digital Content 3 , which displays the ventral side of the brachioplasty preoperatively, http://links.lww.com/PRSGO/D945.) ( See figure, Supplemental Digital Content 4 , which displays the ventral side of the brachioplasty postoperatively, http://links.lww.com/PRSGO/D946.)
补充视频 / 附件(原文未随文提供原图,可于出版方页面查看)gox-13-e6651-s004.mp4Video 4 displays preoperative markings of the brachioplasty.
During surgery and hospital care, the patient wears intermittent pneumatic compression devices and receives dalteparin while hospitalized to prevent deep venous thrombosis. The patient is encouraged to mobilize on the day of the operation. After 1 night (FDL, medial thigh lift, brachioplasty) or 2 nights (LBL), patients are released from the hospital, and after 2 weeks, they return for a checkup with the nurse. Until this checkup, the patient is advised to mobilize with ease. The patient should wear a compression bodysuit and avoid exercise and heavy lifting for 6 weeks postsurgery.
Always make sure to remeasure the markings made preoperatively when the patient is under anesthesia. To prevent under-resection, use a towel clamp to assess the maximum skin stretch before making any incisions. To prevent over-resection, always incorporate a safety margin. These safety margins vary by procedure and are described earlier.
This article provides insight into the body contouring surgery techniques of the Catharina Hospital in Eindhoven, the Netherlands. Standardized measurements facilitate adequate instructions for residents and colleagues and help avoid over- or under-resection. Moreover, the development of this technique reduced OR time from 6 to 3–4 hours for an LBL in our hospital.
Although this article offers an overview of the techniques we have developed, we do not have data regarding the reduction of complications or patient satisfaction. Future studies should incorporate this information. However, Janssen et al 20 found that patients value contour more than scars.
The authors have no financial interest to declare in relation to the content of this article.
补充视频 / 附件(原文未随文提供原图,可于出版方页面查看)gox-13-e6651-s005.pdf补充视频 / 附件(原文未随文提供原图,可于出版方页面查看)gox-13-e6651-s006.pdf补充视频 / 附件(原文未随文提供原图,可于出版方页面查看)gox-13-e6651-s007.pdf补充视频 / 附件(原文未随文提供原图,可于出版方页面查看)gox-13-e6651-s008.pdf
声明:中文精读 · 仅供学术参考。内容来自公开文献检索,不代表本人观点,不构成诊疗建议。 医疗美容需在正规医疗机构由执业医师实施。
基于相同主题推荐 · 继续深挖
该文为技术述评,系统描述了荷兰 Catharina 医院在 fleur-de-lis 腹壁成形、下躯体提升、大腿内侧提升与臂部成形中的标准化术前标记与切口设计。
回顾性病例系列(循证等级IV),纳入400例女性除皱患者(平均49岁,范围38至72岁),2019年3月至2025年9月施行,其中单纯颊部提升250例、全面部除皱150例。

隧道式深层平面提升术(TDL)融合深层平面提升与 SMAS 折叠,为下面部与颈部松弛的改良术式;本研究为回顾性队列,纳入 2023–2025 年哥伦比亚 93 例随访≥1 年患者。